06.03.2014
The kenguryatnik is such a unique detail that car enthusiasts are increasingly paying attention to. But few people know the main task, as well as the technical properties of this device, because most often this device is installed only as a decorative external element. Although some are still aware that the guard is necessary in order to protect the car from various damages. By the way, the original function of the kenguryatnik was to separate livestock on American farms. Then they began to be used for the same purpose in Australia. And only after a while this element firmly established itself on cars in other countries of the world, slightly changing its purpose.
Well, from this article you will learn: is it possible to make a kangaroo cage with your own hands and what might you need for this?
Materials and tools
First, on the materials. It is best to make the structure from polished stainless steel. It not only looks cooler, but is also much more practical. You will have to touch up painted pipes after each trip to the country or fishing. Stainless steel does not have such problems, although it is more expensive, but it will save you from unnecessary hassle in the future.
Pipe diameter is 50 - 55 mm for SUVs, for regular cars 40 - 45.
The quality and appearance of the structure will depend on which welding machine you use. Only an argon-arc apparatus will allow you to make seams that you can grind and polish as if it were a solid pipe. If you do not have a pipe bender, you will have to purchase several corners (bends). You may need corners at 90 or 45 degrees, it all depends on the complexity of the design you choose. You may also need a pipe cutter.
What you need for work
A stainless steel kenguryat will look very good on a car of any color. But stainless steel is much more expensive than regular steel. A logical question arises: what will you use to cook it with? Therefore, it would be better to weld a structure from sections of ordinary steel pipe using a semi-automatic machine. If you paint it “Snow Queen” and cover it with car varnish, it will also look good. If this option is suitable, you need to have the following materials and tools.
- Steel pipe.
- Angle grinder with cutting, cleaning and grinding discs.
- Semi-automatic welding.
- Waterproof sandpaper No. 400 and 800.
- Phosphoric acid or a rust converter based on it.
- Degreaser.
- Primer, paint and varnish in aerosol cans, if you don’t have a compressor and a spray gun.
Article on the topic: How to open the hood if the cable breaks?
How to do it without a pipe bender
Many people know that when bending a steel pipe without special tools at the bend, it can become flattened or even break. Of course, you can buy several corners from a pipe of the required diameter. But this will increase the number of welding seams, and their processing is very labor-intensive. There is a simple way to bend metal pipe that avoids unnecessary expense and unnecessary processing. You can carefully bend a steel pipe as follows.
- Cover one end of the pipe with a plug (the easiest way is to cut it out of wood). Do not forget that after bending the pipe, the plug will need to be removed; leave at least 10 cm outside.
- Fill the pipe full with fine sand.
- Close the other end in the same way.
- Drive two pieces of pipe into the ground, the diameter of one of which is equal to twice the bend radius.
- Place the bendable pipe between the driven sections.
- Heat the folded area evenly on all sides until it glows faintly. You can heat it with a gas burner or a regular blowtorch.
- After pulling the pipe, bend it. If the length of the free end is short and you do not have enough strength, put a piece of pipe of a larger diameter of a suitable length on it.
Manufacturing process
Having made markings on the prepared pipes and angles of the same diameter as the pipes (if you have a pipe bender, you won’t need the angles), you can begin cutting pieces of the required length with a grinder. The main thing to remember is the overall symmetry of the design. When connecting T-shaped jumpers to the main pipes, try to leave minimal gaps (no more than 1 mm). To do this you will need a pipe cutter,
After preparing all the elements, check again that all parts used are identical.
Next, measure and mark the places where the structural elements and jumpers will be welded, this will allow you to save time when welding.
After marking, tack the parts by welding. Start with the folds, as it is much easier to polish and sand the seams while the fold is separate from the main structure. After this, grab the bent pipes to the base. After the next check for symmetry, weld everything using argon-arc welding.
How to take measurements for a drawing?
kenguryatnik from a profile pipe
The guard for protecting the front bumper is made of bent metal pipes. It protects the front of the car from damage when driving off-road, but not only. On rough terrain, you can inadvertently drive into a deep hole or run into a stump, and kengurin will prevent serious damage.
To make a cage yourself in a garage, you will have to make some effort and spend a little time. Start by drawing up a drawing, studying photographs and choosing an option that suits your appearance. The exact dimensions of the kengurin elements play an important role, so first measure the front part of your car on which you plan to install the structure.
Before work, be sure to determine the attachment points of the structure and do not forget to take this into account when drawing up the drawing.
The price for a kenguryatnik is quite high, so regardless of the apparent complexity of the work, you should try to make the structure yourself, if you know at least a little how to work with a welding machine. At the same time, you can make a power bumper so that it covers the radiator, headlights and even part of the car’s wings.
Installation of kengurin
The service life of the accessory largely depends on proper fastening.
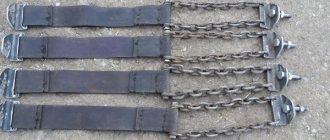
Measure the distance between the side members of your car and, at the same distance, weld two thick pipes to the kengurin that go to the side members. Attach fastenings to the ends of these pipes; plates, about 10 mm with holes of M10 or M12 bolts, will do.
Next you will need helpers.
The entire structure must be attached to the front of the car (with a gap of 10 mm from the bumper). In this case, the fastenings should be located directly opposite the side members. Next, through the mounting holes, make marks for the holes on the side members. All that remains is to drill holes in the side members and bolt the kengurin to the side members.
Remember that there is no point in strongly securing the cage, because upon impact, the structure should bend, and thereby protect the frame and side members of the car from damage.
We hope that our instructions on how to make a kenguryatnik will be useful for you and will help in making your accessory.
Do-it-yourself power kangurin - Community "Kulibin Club" on DRIVE2
Good day everyone! Finally found the time to write about the kenguryatnik. I did it myself, without a special tool, and thus, maybe my experience will be useful to someone. I won’t describe much, everything is already clear, I’ll post more photos, if something is not clear, ask, I’ll be happy to help with something. I don’t have dimensions or drawings, I did everything locally. In general, I can imagine what it will all look like, but I can’t draw it. First I made a seat for the kengurin itself. Since all cars are different, I won’t focus on this; everything is clear from the photo. Moreover, I have already described this in more detail myself.
The kenguryatnik was made from a water pipe with a diameter of 70 and 56 mm. I don’t know how to bend pipes, and buying a pipe bender is too expensive for me, and in general I don’t think you can bend such a diameter beautifully without warming it up. Therefore, I took the simpler route by purchasing bends. Leads are our EVERYTHING! If someone does something similar, I advise you to buy solid-rolled elbows, not bent ones. Buy bends immediately in one place, from the same manufacturer, because they look the same, but in reality they are all different, both in bending and in diameter. It is better, of course, that the diameters of the pipes and bends match perfectly. To make everything nice and even, I welded the pipes in separate elements and then welded everything into one large piece of iron.
sample
First, I welded the cage itself, then I welded the platform for the winch. Actually, the platform for the winch is nothing more than two pieces of channel with lugs welded to them, for fastening with bolts. The channels run parallel at such a distance from each other that they can pass between the bumper grille jumpers (for my car). First of all, I drilled and screwed these channels to the seat on the frame for attaching the guard, then I put on the bumper and began to fit the guard itself to the car.
When the height and distance from the bumper were chosen, I welded the channels together with the cradle, right on the car, having first disconnected the battery terminals and covered the car so that scale would not damage the enamel.
Then, having unscrewed the kenguryatnik (already together with the channels), he began to thoroughly weld all the seams. I would like to give advice: before you weld the pipes, it is better to immediately remove rust, since then it will simply be inconvenient to crawl into hard-to-reach places with a grinder.
www.drive2.ru
First fitting
Now fitting at NIVU
And a side view of the scalded end
Let's see how it looks with square fog lights... not very good, round, it should be with round ones, especially since there are round PTFs, they will be used for installation on the bumper
Design and purpose of the “kenguryatnik”
The power bumper is a structure made of metal pipes attached to the front of the vehicle. It serves to protect the head lighting equipment, hood, radiator grille and some other elements while driving through wooded or rough terrain. In the harsh climatic conditions of the middle zone, the “kenguryatnik” is relevant when driving through deep snowdrifts. Protection saves you from unexpected encounters with animals crossing the road while driving in conditions of limited visibility.
The power bumper has also become a decorative element of the car - you can find a variety of fog lights on it, often in large quantities; winches and other attachments are placed on it.
For UAZs, given their off-road qualities, the “kenguryatnik” is rather a necessity. The device does not cause any particular inconvenience, but it is practical and looks attractive.
Design Features
“Kenguryatnik” cannot be a structure made of pipes of different sizes, bent in any shape, as many folk “craftsmen” think. This is a device that increases the passive safety of a car when involved in an accident. When hitting a pedestrian, the latter will receive fewer injuries, will not hit the hood and then the windshield, which means the car will not receive damage. Therefore, homemade power bumpers are not welcome. Their production must be carried out by specialized organizations that have permits, certificates and other regulatory documents.
In practice, this is rather an exception to the rule - a minority of car owners turn to such organizations. Structurally, the device must consist of metal pipes and rods welded together, bent in a certain way. They are hollow in shape, their diameter must be at least 28 mm and no more than 110 mm.
Materials used and types of “kenguryatniks”
The front protection grilles are made of stainless steel. This metal was not chosen by chance - it is one of the most durable alloys that reliably protects car elements from damage. We must not forget about corrosion resistance - the metal is not susceptible to rust. Car enthusiasts often use aluminum pipes - they are cheaper and easier to process, but their protective characteristics are low due to the softness of the metal.
There are two main types of “kenguryatniks” on UAZ. The first is extended, used to protect the radiator grille, bumper, front fenders and head lighting equipment. The second type is made in the form of a horseshoe, protecting only the bumpers and radiator grille.
Installation permission
Recently, the rules for using “kenguryatniks” on all cars, including UAZ, have become stricter. This concerns accidents involving pedestrians. If in a minor collision the injuries are minor, and the power bumper even protects against them, then in a serious impact the device can cause fatal wounds. For this reason, “kengurins” on UAZ vehicles are illegal, but they are not completely banned.
According to the new legislation, car owners do not have the right to install power bumpers on their cars. Traffic police officers may issue a fine for them. But the law also states that the ban does not apply to all body kits without exception. The following types are prohibited:
- the size of the power bumper is significantly larger than the standard one;
- extra elements installed in front of the bumper;
- homemade structures, the reliability and strength of which are not documented.
If the alternative bumper is no larger than the standard one and is supplemented with a protective arch, then it can be installed on any car - traffic police officers will not have any questions.
The car owner who has installed a power bumper must be aware that his actions lead to changes in the design of the vehicle. For such procedures, you must have a special permit; it is issued by the traffic police.
At the final stage, it is recommended to treat the bumper with an anti-corrosion compound.
You can consider in more detail the manufacture of a “kenguryatnik” on a UAZ 469. To do this, you will need the following materials and tools:
- steel pipes with a diameter of 60 mm for the frame;
- metal pipes with a diameter of 40 mm to create complex bends;
- metal corners;
- angle grinder (grinder);
- welding machine (inverter or semi-automatic);
- pipe bending tool;
- bolts with nuts;
- plugs for pipes.
You can use ordinary metal pipes, but the best option is stainless steel. This bumper does not rust, is durable and looks more attractive. Even if a ferrous metal “kenguryatnik” is painted, sooner or later the paint will be damaged. For fasteners and plugs, you can use fittings for mounting railings. To work with “stainless steel” you will need argon welding.
You can use ready-made drawings from the Internet. But if the bumper is made for a different model, some additional elements will need to be made. For the “loaf” the frame is made of a metal channel. The work on creating a power bumper for a Patriot, Hunter or “loaf” differs slightly.
If you decide to make a “kenguryatnik” with your own hands and install it yourself, you should take into account that you will need the skills of a designer, welder, and mechanic. You need a garage with an inspection hole and additional equipment - pipe bender, welding, grinder. If you are not confident in your own capabilities, it is better to turn this question to specialists or buy a ready-made option.
Bending cuts
Based on the results of the calculation, it turned out that it would be too close to the “muzzle” and the winch might not fit in the future. Therefore, I welded the channel pieces in this way. In the photo below, a cut has already been made to bend the edges of the bumper a little back.
The cut was initially made by eye, it looks like this before the bend
It is bent by the method of “jumping” onto it, previously supported on a stump or any other hill
Now we have this design, let’s estimate it on a car.
Making a front bumper with your own hands.
If you don’t want to spend money on a ready-made body kit, it’s easy to make it yourself. To do this, you only need material, tools and straight hands.
What do you need:
- Metal 4 mm thick, channel, corners. The exact number of parts depends on the body kit model.
- Welding equipment
- Grinder, bolts, discs.
Before you start welding, you need to make a model out of cardboard. This will make it even more convenient to try on the future bumper. We cut out the pattern pieces from metal. We use a grinder and metal discs. We bend the metal with a torch and protect our face and hands.
We remove all attachments from the front of the VAZ 2131, install the base for the winch and secure the bumper with bolts. Reinforcement of the side members will be required; we will use metal plates. After installation, we treat the bumper with an anti-corrosion compound and paint it.
Plastic body kits
This type of body kit is installed on the Niva 21214 rather for beauty and to satisfy the ambitions of its owner. Used as an opportunity to personalize the car. Off-road, a plastic body kit is not only useless, but also ridiculous in the eyes of experienced jeepers. Bushes and trees tear off door linings, plastic bumpers crumble and shatter into pieces upon contact with hard objects.
In addition, clay that has “washed up” the wheels and clogged the wheel arches easily tears off the plastic bumpers. It is traditionally believed that plastic adds aerodynamics to a car, but you can, of course, imagine Niva 2121 and 21214 rushing along the highway at a speed of 150 km/h, but the car is not designed for such speeds. That is why the manufacturer made it angular and not streamlined.
The procedure for installing a body kit often takes place in the garage, with your own hands, and after a year and a half, car owners are faced with the fact that rust and even through corrosion have started to appear on the body. This is due to the fact that dirt gets clogged in the gaps between the metal and plastic, which remains wet for a long time under the influence of moisture, and when in contact with the metal of the body, it rots and blooms.
The metal is damaged, and moisture completes its work. Before installing the body kit, craftsmen try to thoroughly treat the body with an anti-corrosion agent or mastic. The body kit is attached with double-sided tape, liquid nails and caps, and the bumpers are mounted on self-tapping screws. The price range is lower than that of a metal body kit.
Front bumper
The front part of the VAZ 21214 is its main part, because the engine of the vast majority of cars is located in front, so here you need to take a closer look at the quality and thickness of the plastic. Although, with a good blow, nothing will save him.
One of the useful body kits is arch extensions. Thanks to them, dirt does not fly onto the body from under the installed wheels of larger diameter and with “evil” off-road tires. They are most often mounted together with thresholds. The arches look good with wide and large wheels.
How to legalize a kangaroo on a car
If you have installed a certified dog guard on your car, you must register it with the traffic police. Otherwise, you will be fined. In order to do this, you need to collect the following package of documents:
- certificate for the product and its copy with a seal (it comes complete with the kenguryatnik itself);
- application for changes to the design of the vehicle;
- a certificate confirming the installation of equipment in a specialized workshop;
- work order for installation of the kenguryatnik.
You will receive the last three documents from the organization where the new equipment was installed.
If you installed the bumper yourself, then you will need to additionally undergo an expert commission, which will determine that the installation was carried out in accordance with all the rules and does not pose a danger during operation. This is quite an expensive pleasure, so there is no point in saving on it. It is better to entrust the installation of equipment to professionals.
After installation and collection of all documents, a long and tedious bureaucratic process awaits you, which includes many stages of assessing and registering changes in the design of the car.
- You must write a corresponding application to the Interdistrict Examination Department (MREO) of the State Traffic Safety Inspectorate, where your car was registered.
- The authenticity of all documents will be verified by an expert.
- After this, you will receive an unscheduled technical inspection.
- If the inspection is successful, you can contact the head of the MREO. He is the one who signs your application.
- Then the car is inspected at the site, and if no violations are identified, it will receive an entry in the technical passport.
Such registration of the vehicle will save you from all possible problems with changing the design of the car.
Selection of protective equipment
The first thing you need to do is buy kengurin. They are produced in several types with different levels of protection for the Niva front end. Some of them are called “arc”. This device on 2121 is made in the form of an arc from a medium-diameter pipe. Equipment of this design provides additional protection for the lower front part and bumper. To enhance the protection of the bottom, the kengurin can be additionally reinforced in this part with longitudinal inserts.
For the Niva SUV, it is also possible to purchase a kenguryatnik, called “Safari”. Such equipment, in addition to protecting the bottom and bumper, also provides protection:
since its side protrusions are somewhat wider than the VAZ 2121 itself. Such a guard will protect the entire front part of the SUV from damage and scratches.
Additionally, this equipment allows you to install several auxiliary headlights and fog lights. Some owners of Niva SUVs do not install a roof rack because, due to its significant weight, it disrupts the correct weight distribution.
An alternative to this equipment is to strengthen the standard bumper and install additional protection for the pallet. But this modernization will not protect the headlights and fenders from damage when moving over rough terrain.