Does the Polo sedan really have a galvanized body?
The Volkswagen company uses galvanized body coating on all its models, therefore, the Polo sedan has a galvanized body. It should be noted that zinc treatment is now carried out by almost all manufacturers of modern cars, with the exception of Chinese brands, but not many have complete galvanization of the body. For example, Kia and Hyundai galvanize their bodies only when galvanized, hence the conclusion that only German manufacturers galvanize the body completely on both sides, and the Polo sedan has a galvanized body completely on both sides!
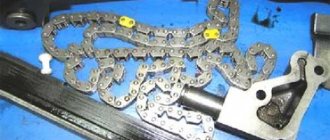
What are the dangers of a worn chain?
Driving with a worn timing chain is fraught with serious consequences. Of course, a chain is not a belt, and it is unlikely to break, but with a certain degree of wear, it may well jump off the sprockets. Then the pistons will collide with the valves, which will lead to deformation of the latter. The pistons and cylinders will also be damaged, and the car will have to undergo a major overhaul. In addition, after a certain period of time the chain will certainly stretch, and it will also have to be replaced. In order not to forget when the chain was last replaced, you can put a sign under the hood with the corresponding inscription.
But what symptoms will indicate wear of the chain drive:
- the car no longer starts immediately;
- when the engine is turned on, extraneous noises are heard;
- the car began to consume much more fuel;
- engine power has decreased.
If one of these symptoms is detected, you should pay attention to the condition of the chain transmission. Of course, there may be other reasons, but chain wear is still quite likely.
Every car enthusiast can carry out repairs of this complexity. Of course, you can contact specialists. But such repairs are not cheap. This is, firstly, and secondly, by personally replacing a chain drive, you gain experience, which is so necessary for those who want to work on their car.
If you decide that you will change the chain yourself, then stock up on everything you need. Go to the store and buy new supplies there. In addition to the chain itself, you will most likely have to replace the tensioners and dampers. Prepare the necessary equipment for repair:
- jack;
- spanners;
- set of heads;
- screwdrivers with different types of tips.
Now that everything is ready, you can proceed directly to the repair. Don't forget about safety precautions. Remember that it is very easy to injure yourself or even hurt yourself when making this type of repair, so be careful.
About engine maintenance
To begin with, I would like to say that the condition of the oil greatly affects the life of the chain. It is located inside, therefore, the better it is lubricated, the more the resource will increase. Also, indirectly, frequent replacement removes from the engine any debris such as sand, dirt, etc., which breaks and wears out the chain mechanism, because sand can penetrate anywhere, including into the connecting links. The new oil makes the pistons slide better, which relieves unnecessary stress on the chain mechanism.
In general, the result is this - to increase the service life, you just need to change the oil more often, at least every 1000 kilometers, but ahead of schedule. That is, the dealer claims 15,000 - change after 13 - 14,000, and ideally after 10,000, then the chain will last much longer.
The process of replacing a chain drive without the involvement of specialists
Typically, replacing a chain drive takes 4-5 hours. Of course, everything here will depend on the level of training of the car enthusiast. So let's begin.
- We install the car on the overpass.
- We remove the protection from the engine.
- We de-energize the car by disconnecting the left terminal from the battery.
- We remove the air intake.
- Now pay attention to the camshaft casing. There is a ventilation hose on it. It needs to be removed.
- We also remove the non-return ventilation valve.
- The oil separator is bolted to the cylinder block with two bolts. Unscrew them and remove the oil separator. The pipe must be routed through the hole.
- Remove the auxiliary drive.
- The refrigerant must now be removed from the air conditioning system.
- Pay attention to the clamps of the air conditioner wiring harness block. You need to press on them and remove the block by slightly pulling it in your direction.
- We remove the high and low pressure pipelines. The holes formed in their place must be plugged immediately. Be sure to do this, otherwise dirt will get into the system.
- We also remove the air conditioning compressor. To do this you will have to unscrew 3 bolts.
- We also remove the compressor bracket. It is also secured with three bolts.
- Now you need to drain the oil from the engine system.
- We dismantle the flywheel shield.
- Remove the oil sump. This is where you will have to tinker, since you will have to unscrew as many as 20 bolts.
- The oil pan will also have to be removed. He may not give in the first time. To remove it, you need to make uniform blows with a hammer along the entire perimeter.
- Now we take the mounting blade and use it to fix the crankshaft so that it does not rotate. Unscrew the bolt that secures the crankshaft pulley. We remove the pulley.
- Drain the antifreeze.
- Now we remove the pulley of the pump that supplies coolant to the system.
- We remove the power unit using a lift.
- Remove the suspension support bracket, which is located on the right.
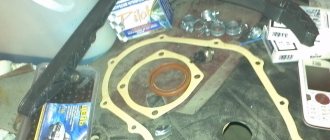
- Now remove the chain drive cover. Don't forget to remove the gasket. Assess her condition. It may also need to be replaced.
24. Mark the location of the chain drive and gears on the shafts. 25. Press out the chain tensioner and fix it in this position. 26. Remove the chain tensioners, having first unscrewed all the necessary bolts. 27. Remove the shoe, and after it the chain itself.
Assembly procedures should be carried out in reverse order. Be sure to check the engine operation. If uncharacteristic noises are heard, it means something was done incorrectly and the procedure will have to be repeated.
Video
The AEV engine was installed on cars:
Volkswagen Polo 3 / Volkswagen Polo 3 (model code: 6N1) 1995 - 2000
The information is suitable for repairing other cars as well.
So, recently the hydraulic compensators began to knock, even after warming up, and the verdict was made - they need to be replaced. It’s just time to change the oil, along the way we’ll change consumables (oil and air filters), timing belt, serpentine belt (it started whistling like on a basin) and, as a finishing touch, oil.
Before starting work, you must have: 1. A set of tools (heads, wrenches, hexagons, etc.) 2. Spare parts that need to be replaced (filters, hydraulic compensators, oil, belts) 3. Free time and space for repairs
Let's get started
Remove the air filter cover, take out the filter and unscrew the 3 nuts that hold the lower part of the housing
Remove the timing belt protective cover by snapping off the clamps with a screwdriver, 2 at the front and 1 at the rear.
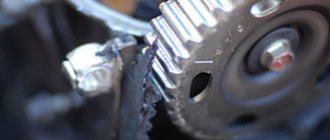
Loosen the roller (in the direction of the arrow) and remove the poly V-belt
As we can see from the following pictures, we bought a new one for a reason and installed a new one from Ae in mid-November, therefore we conclude that we don’t buy belts from this company anymore
This was the cause of the unpleasant whistling. We will replace it with this one
Go ahead and unscrew the crankshaft pulley. Here you need to be more careful with the bolts, because... they have an internal hexagon, which is easy to flare if not inserted tightly due to dirt. Therefore, we clean everything thoroughly, you can spray a little VD. It’s better, of course, to have spare ones in case of a breakdown. At the same time, drain the oil, replacing the waste container (marked with an arrow)
We use a spanner to help turn the crankshaft to unscrew the remaining bolts
Afterwards we take everything out, including the timing belt pulley and we have the following picture
We go up, remove the valve cover, and begin to unscrew the camshaft caps. The most important thing when reassembling is to align them correctly. Some of them (I don’t have all of them) have serial numbers (shown by an arrow), indicating in what place they should be placed, they also serve as a guide, i.e. they need to be placed facing you, and not vice versa. It is also better to have a few M7 studs in reserve if you are not sure that the threads on them are good and nothing is broken (I had to replace 2, the previous “masters” needed to tear off something, who screwed bolts into the head instead of studs, and not on M7)
After we unscrew everything, we remove the camshaft and here they are, the culprits of the repair
We pull out the old hydraulic compensators, either by hand or with a magnet, and prepare a place for the new ones
We unpack the new ones (by the way, the old ones were also INA? Unfortunately, it’s not known how long they lasted)
While your partner was inserting the hydraulics, you can replace the oil filter in the meantime. Lightly lubricate the rubber band with new oil and twist it by hand, that’s enough!
True, some people tighten up and pull the filters with a wrench, but there is no need to do this, nothing will leak from it provided there is a good filter and sealing rubber (I used KNECHT/MAHLE OC295). The installation location is marked with an arrow
After installing the hydraulic compensators, we assemble everything in the reverse order, observing the tightening torques! We tighten the camshaft cover mounting bolts with a torque of 10 Nm, and turn the nuts on the studs with a torque of 6 Nm + 90 degrees.
Now, before putting on the timing belt, we put marks on the camshaft and crankshafts. On the crankshaft gear, one tooth is sawn off and there is a protrusion on the block that should be aligned (the photo was taken at an angle, so from this angle it seems that the marks are slightly misaligned)
There is a point on the camshaft pulley that needs to be aligned with the plastic protrusion on the protective casing (marked with an arrow)
After putting the belt on, tighten the timing belt roller. Insert the hexagon 6, pull in the direction of the green arrow until a characteristic click occurs when the roller tongue jumps onto the mark (marked with a red arrow)
We assemble the elements of the air filter housing and before closing the cover, install a new filter (KNECHT/MAHLE LX568)
Now we are at the finish line, all we have to do is add new oil. I use the original from Nissan 5w-40, I get it through drivers who are prescribed oil for their company cars from an official dealer for replacement, but they sell it and pour some cheap stuff, or don’t change it at all, the car is not their own. The experience of using this oil is very long , there were no problems with it, in winter it always started the first time, even at -35 (and the winter this time was not particularly warm). To opponents of this oil plan who are afraid for the oil seals, I want to say right away that nothing has squeezed out of me yet, and I think it is unlikely that this oil will squeeze out. For anyone who might be interested, here is its article number in the store KE90090042
PS a friend has been pouring this oil for probably 4-5 years now into an AUDI 100 from 1985. and the engine runs like a clock
Well, that’s all, you can go wash your hands after the repair, comments are welcome, thank you all for your attention
Addition from seric:
When the timing belt is tensioned, there should be no characteristic clicks; the roller is tensioned in the other direction.
Install the tension roller and tighten the fastening nut by hand. — The recess in the support plate -1- must fit around the head of the mounting bolt -2-. — Tension the toothed belt by turning the tensioning roller in the direction of the arrow until the arrow -3- is positioned above the slot in the support plate -arrow-. — Tighten the clamping nut on the tension roller. Tightening torque: 20 Nm
After tensioning the timing belt, it is necessary to turn the crankshaft twice in the direction of engine rotation until it again stops at TDC of the first cylinder. After this, it is necessary to check the position of the toothed belt and tension roller again.
Addition from kentochek:
I replaced the video and took the original because... the difference in price relative to the same INA was only 200 rubles. Here is a photo of the new video
The installation process is similar to that described above for removing the timing belt. The most important thing is to install the roller itself correctly; you need the support plate to cover the bolt and tension the roller correctly. You need to tighten it as described in the diagram above, and make sure that the signal tongue does not “go” beyond the mark, so as not to overtighten the belt. The tightening torque of the nut that secures the roller itself is 20 Nm
Decoding the factory equipment of the car (English)
Decoding the factory equipment of VAG in Russian! Diagnostics of
Volkswagen, Audi, Skoda, Seat, error codes.
If you have not found information on your car, look at the cars built on the platform of your car. Most likely, the information on repair and maintenance will be suitable for your car.
The timing drive is a rotating element that combines the crankshaft and camshaft into a single structure. Thanks to this gas distribution mechanism, kinetic energy is obtained - the main driving force of the car.
Polo today is produced in two modifications - “hatchback” and “sedan”, with the former being produced in European countries, and the latter mainly in Russia (near Kaluga). The 1.6 liter engine, the most popular among our motorists, is available in two series: with 8 and 16 valves (CFNB and CFNA - the corresponding markings).
The difference between them in the Polo lies in the design features of the cylinder block. Of course, the unit with the 16-valve version is the most powerful and dynamic. But in order to fully understand whether the Volkswagen Polo has a better drive - a timing chain or a timing belt, it is necessary to consider all aspects.
Chain power units
So, the engine is 105 hp. s, with a volume of 1.6 liters, the Volkswagen Polo is called CFNA.
- It is a 4-stroke, four-cylinder, 16-valve, dual-camshaft power unit.
- Such an engine in a car is located transverse to the longitudinal axis, which is one of its characteristic features. The operating order of the piston group schematically looks like this: 1 – 3 – 4 – 2, while the strokes are counted from the crankshaft pulley.
- The power system, which looks like phased distributed fuel injection, is based on this DOHC scheme. In other words, the fuel mixture enters the cylinders in portions, passing through the chokes, according to the valve timing. At high speeds, the asynchronous (mixed) fuel supply method starts automatically.
- All accessories on the engine are covered with plastic covers, with especially important ones highlighted in the appropriate color. The excellent dynamics of the Polo go well with economical gasoline consumption - it is only 7 liters per 100 km for different driving (highway-city).
- A double timing chain drive on a Polo sedan is several times more reliable and durable than with a profile belt, and accordingly, this also affects the service life of the car. A non-contact ignition system with 4 coils makes it easy to start the engine at any temperature, reducing fuel consumption.
- At the same time, the variable valve timing (CVVT) complex, which changes the closing level of the intake valves, improves fuel combustion, which directly affects reduced emissions of harmful substances.
- The motor is mounted on three support pads, with the main part of the load falling on the side supports, and the third plays more of a compensator role to reduce vibration.
Now on the automobile market you can buy a Polo sedan with a turbocharged reliable TSI engine of 125 hp. s., which has a chain drive. The highest boost can be from 1400 to 4 thousand rpm, while acceleration to 100 km/h is only 9 seconds. The Polo's maximum speed is 200 km/h with a fuel consumption of 5.8 liters per 100 km.
Timing belt drives
In September 2020, one of the Volkswagen plants located near Kaluga produced the first series of an improved EA211 naturally aspirated engine with a volume of 1.6 liters. with timing belt drive.
Before launch, the power unit was tested on Russian roads, was adapted and began to comply not only with their difficult conditions, but also with environmental standards adopted in Europe (Euro-5).
Not only the timing drive was subject to reconstruction, but also the cylinder head, oil pump, piston group, etc. Today, after modernizing the EA111 engine with an installed chain, the Volkswagen Polo received a new EA211 engine, which began to use a timing belt. Moreover, this improvement made it possible to increase the power of the power unit by 5 liters. With. and became 110 liters. With.
see also
Comments 28
Don't listen to anyone, these engines have a gear timing mechanism
3 belts. Timing belt Oil pump and camshaft as far as I remember. I watched it on my own through the official program
Thanks for the info. I'll know)
3 belts. Timing belt Oil pump and camshaft as far as I remember. I watched it on my own through the official program
I could be wrong, but the oil pump is chain.
I thought so too. I looked at the wine just out of curiosity. Somehow I didn’t even understand. Either happy or upset
I could be wrong, but the oil pump is chain.
Only oil pump - what's new
C.W.V.A. There seem to be no chains.
When I bought the car. I specifically asked the manager about the chain :) yes, yes of course. I laughed quietly to myself. As they say, I have no more questions.
They clearly need to answer what they think the buyer should hear. They turn on the type of psychologists, as they are taught in trainings, and in the end they pour any nonsense into their ears.
The engine has 1.6 110 hp. comes the belt. The chain was on 1.6 105 hp engines. so you can sleep peacefully, you have a timing belt. On the left side of the motor under the plastic cover.
Thanks I'll know.
The engine has 1.6 110 hp. comes the belt. The chain was on 1.6 105 hp engines. so you can sleep peacefully, you have a timing belt. On the left side of the motor under the plastic cover.
Why can’t you sleep peacefully with a chain?
For the purpose of sleeping peacefully, you can. But the author’s question was what? Hence my answer! And if you want to discuss whether a rail or a chain is better? This is not for me. Firstly, there is no desire, and secondly, how many people have so many opinions. (Thank you for reading my response to the author)
I didn’t even think about discussing it. Maybe it's just a chain