The unsatisfactory condition of the paintwork can be caused by many factors: an accident, sandblasting and stones when driving at high speed, branches leaving scratches on the car body, or natural aging of the paintwork. In all cases, painting a car yourself can save a lot of money for the car owner.
It is worth considering that painting body parts or plastic requires certain technological knowledge. If the goal of self-repair is only to save money, and at the same time a lewd attitude towards the process, then it is better to abandon the idea of painting yourself (there is a high probability that you will simply ruin the material, and the result of the work will inevitably force you to turn to specialists).
It’s not enough just to know how to paint a car yourself. You need to be involved in the process and carry out all work with great scrupulousness. In this case, the quality of painting at home will be no worse than that carried out in specialized service stations or garage cooperatives.
Joints and stains
In good auto repair shops, the damaged area is painted with a transition. The enamel is applied not only to the area of the body being repaired, but also to adjacent fragments, so that the color contrast between the repair paint and the factory paint is not so sharp. For example, if a door has been replaced, then not only it, but also the adjacent car door, as well as the adjacent fender, need to be painted. All these are the basic rules of car body repair.
If the renovation was, so to speak, “budget”, and only the doors were painted, then the difference in colors and shades can be very noticeable, because only professionals, and even then not always, ensure a perfect color match.
As experts say, even two new cars from different batches do not always have the same shades.
Types of rollers
Along with brushes, tools such as rollers are used in manual painting work. They are a cylinder made of wood or plastic, having a hole along the entire length, to which bushings are installed at the ends, and equipped with an axis with a handle. The nozzle is put on the roller. Are divided into:
Polyester, for water-dispersion paints for walls and ceilings. They are characterized by increased wear resistance.
Foam rubber, used for wallpapering. They are not suitable for alkyd and nitro enamels, since the solvent will eat the foam rubber.
Polyamide – universal, suitable for dispersion and solvent paints. They have good absorbing and releasing properties. They are easy to clean, do not require special care, and are chemically resistant. Due to the length of the pile, they are suitable for uneven surfaces with holes and bumps.
With a fur nozzle they are used for oil paints, enamels and varnishes.
Velor – to give a special smoothness to the treated surface. The bristles on such rollers are very short, suitable for processing a flat, smooth surface.
Structural – used for painting with structural paints and plasters, giving a textured coating to the surface being treated.
The listed catalog of rollers is far from complete - there are specialized painting tools, for example, rubber and plastic pressure rollers, needle rollers for removing wallpaper, paneled rollers, and also for painting corners.
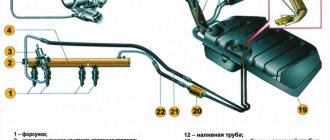
The above-mentioned painting tools are not suitable for painting a car - in such cases, use a spray gun or a paint gun, connected with a hose to a compressor that produces uniform pressure. You also need a room with exhaust ventilation, isolated from dust, as well as a special drying chamber.
Varnishes and enamels for cars are dried in such chambers at high temperatures. Without special skills and many years of practice, such work cannot be done well - you cannot avoid streaks of varnish or car enamel. Therefore, you should entrust it to professionals.
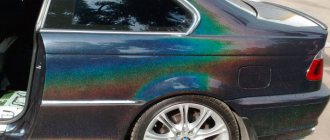
How to distinguish shades?
Not everyone can distinguish the painted areas of the body. This requires parameters such as:
- First of all, of course, a clean body.
- Secondly, the room should have bright lighting; If the car will be inspected on the street, then this should be done during the day.
- An important parameter is good color sensitivity of the viewer.
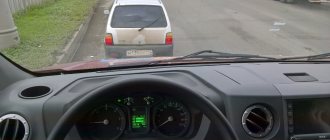
The difference is usually visible from certain angles, so we advise you to walk around the car or ask the seller to drive in a circle, preferably first in one direction and then in the other.
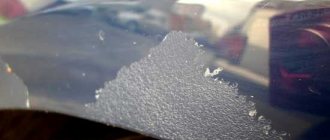
Car enthusiasts often ask themselves this question: is it possible to carry out painting without even a professional noticing it? Experts answer that from a theoretical point of view it is possible, but from a practical point of view it is unlikely. An experienced eye notices not only the difference in shade, but also the different quality of the body surface, namely shagreen, grain, etc.
To ensure a perfect match with the factory paint, a very expensive and scrupulous approach is needed, which is why a trained eye in most cases sees tinted areas of the body.
Necessary tools when painting a car
There are quite a lot of special tools that are used to update a car. The service station has a good arsenal, but if you do the work at home, it may seem that it is much cheaper to order the services of a specialist than to buy equipment. Actually this is not true. All the tools necessary for applying paint may be needed when performing other chores, so their purchase will be thoughtful and appropriate.
To paint a car you need the following tools:
- A spray gun is the most necessary item, which is a medium-sized paint gun with several nozzles. It is used to spray paint and apply it evenly to the surface of the car. This tool can be used to work with varnish, liquid primer and putty. It should be noted that the spray gun can be small in size, and this is perfect for local painting of the surface of a car;
- During preparatory work, a special vinyl drill attachment will be indispensable. It will help you quickly remove a layer of paint, rust, primer, and clean the surface right down to the metal. Thanks to this attachment, the work is gentle enough on the metal without damaging it. Such a tool will be indispensable on the farm;
- You will need a hair dryer for this work. It will effectively and quickly remove all decorative stickers and parts from the surface of the vehicle. In addition, if the surface of the bumper is deformed, you can use a hairdryer to heat it up and then manually remove dents and damage;
- an orbital sander, which is a universal item that may be needed not only for painting a car. Using this device, you can perfectly level the surface in order to apply putty or primer to it. In addition, the grinding tool will help when grinding the top applied layer for further polishing;
- Not a single car renovation process is complete without polishing. Thus, a necessary item is a polishing machine. It helps to carry out finishing work in such a way that a thin layer of the material being processed is removed, thereby eliminating roughness and giving the surface a mirror shine;
- You must have a compressor. A well-chosen mechanism will allow for high-quality painting. With its help, paint is supplied from the painting console evenly, and with optimal pressure, paint streaks do not form on the surface of the car, which become visible defects when drying.
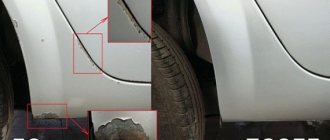
Measuring the thickness of the paintwork
The most accurate way to determine body repair is to measure the thickness of the car's paintwork. This can be done using a special device - a “thickness gauge”, as it is called in auto repair shops. This device is simply applied, for example, to the wing, and the display shows the thickness value in micrometers.
For example, if the thickness is 110, 180 and 300, then the car was clearly painted, because such a range of thicknesses is impossible on the original car. The factory paint layer is thin and uniform. If putty was used during the repair, the device readings will be even higher. Cars from different manufacturers have their own paint thickness standards. So, Russian and Japanese have a thinner layer, while American ones have a thicker layer.
By the way, such a device is available in almost all dealerships and workshops where they repair cars. If you have doubts about paintwork when buying a car, you can turn to experts.
Materials
High-quality painting of a car with your own hands is impossible without the use of appropriate materials:
- paint, hardener and thinner (mixing proportions can be found in the instructions for each type of paint). The paint you will most likely need is acrylic enamel, since it is most often used in painting car bodies;
- soils:
- acidic, if there were pockets of corrosion on the surface before treatment;
- insulating soil;
- primer-filler.
- putty:
- filler – used for treating surfaces with large area dents;
- for reinforcement (hair) – has inclusions of fiberglass, well suited for processing large areas;
- finishing – used at the stage of final drawing of planes;
- universal;
- putty for plastic – has good adhesion to plastic elements (mostly used when working with bumpers);
- liquid – allows you to hide particularly small scratches and pores.
- abrasive materials of different grain sizes (p80-p1500) for grinding and washing the surface (scratches are applied to the surface, which improve adhesion and level the plane), as well as wipes for degreasing the surface. Degreaser, ordinary acrylic black paint, which will be used as a developing layer during the sanding process of putty.
Technology
The work order includes the following steps:
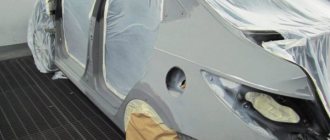
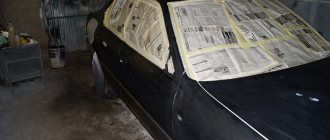
- dismantling elements that prevent access to hidden cavities. Parts that will not be painted should be covered with insulating material (masking paper, newspaper, film);
- degreasing the surface, removing bitumen stains;
- removing the old layer of paint from the repair area (it is advisable to putty on the “bare” metal), matting the entire surface;
- putty followed by sanding and giving the body element natural shapes;
- repeated application of putty (it is almost impossible to perfectly remove the plane in one go);
- applying a developing layer and re-grinding;
- application of primers;
- washing out the soil (wiping down to metal or putty is covered with a second layer of soil);
- degreasing;
- applying the required number of layers of base paint;
- surface varnishing;
- final polishing.
At all stages of work, be sure to use personal protective equipment (protective mask with respirator, gloves).
What should you not pay attention to?
According to experts, small dents, without damaging the body paint, do not threaten anything. Well, if only by loss of aesthetics. Such dents can be corrected at any car service center. This is often done using a no-disassembly method called Paintless Dent Repair. In this way, marks on the sides of the car from, so to speak, “enemy” doors can be quickly and easily removed.
Scratches and chips on the bumpers also do not affect the functionality of the car. Note that in cramped European cities, hemmed and slightly damaged bumpers are quite normal. Torn aerodynamic aprons and a crooked bumper often indicate a not very successful off-road foray, and there is nothing wrong with that. If the remaining elements are intact and intact, then this is not critical.
Another inevitable evil is a network of microscopic scratches on the body, which usually appears in the first months of operation, for example, after frequent washes.
Local touch-up of elements is not a problem either. If in doubt, you can again use a “thickness gauge”, which will show whether there is putty on the part. If there is a large difference in values, you can reduce the price.
Necessary materials for high-quality car painting
For effective, high-quality work, it is not enough to have special tools and equipment. You also need to have high-quality consumables. Having them, you can carry out a neat update of the car.
The required materials are the following:
- abrasive sources. This material, in most cases, is sandpaper of varying strengths, as well as tapes and bars. Using them, you can accurately grind the surface;
- After the vehicle has been sanded, its surface should be covered with putty, which will even out all scratches, dents, and also eliminate roughness and damage. Depending on the degree of damage, the type of putty is selected. At the moment, acrylic liquid products, fine-grained finishing products, as well as substances containing fiberglass are actively used. Thanks to such materials, even the deepest dents and scratches on the surface of the body are eliminated;
- primer. Another one of the necessary materials that will ensure high-quality painting. It is used to eliminate small, unnoticeable irregularities when applying paint. If the primer is applied to the plastic parts of the car, it will ensure excellent adhesion of the paint and varnish to the material itself;
- polishing paste - a product also necessary to renew the surface of the vehicle. Depending on the desired effect, pastes of various structures are used. To achieve a matte finish, a coarse polishing agent is used. And for shine, pastes of liquid consistency are used;
- paints and varnishes. As mentioned earlier, depending on the desired result, you can use acrylic enamel, two-component paint and oil-based resin products. As for varnish, the choice here depends on many factors, including the expected effect.
Thus, all the tools and materials that are needed for painting a car may be needed not only when updating the vehicle. They will become indispensable helpers in the household. Don’t skimp on the tool, buy a branded product and it will serve you for many years.
Tool
In order to paint a part or the entire car, you will need:
- a room where a stable temperature will be maintained during the process. For comfortable painting, the minimum temperature should not fall below 15ºC, and the maximum should not exceed about 30ºC. It is advisable that the room be ventilated;
- a compressor for supplying compressed air, a hose of sufficient length (about 10 m) and an acceptable internal diameter (a cross-section of less than 8 mm will negatively affect the air flow). The compressor power required will depend on the area to be painted. If this is just one part that has scratches that cannot be polished, and there is no money to buy an expensive compressor, then you can take a single-piston unit with a 24-50 liter receiver and an amount of air at the inlet equal to 200-220 liters (this is the value indicated by most manufacturers in characteristics for the device). For larger volumes of work, as well as faster painting, you will need a compressor with higher performance and an increased receiver volume;
- spray gun. There are spray guns on the market designed according to 3 main patented technologies:
- HP – requires high pressure to operate;
- HVLP – operates in low pressure mode, but with high air consumption;
- LVLP – requires low pressure and less air consumption to operate. This type is best suited for weak compressors with low capacity.
- tools for surface preparation: bars for washing the surface, spatulas for applying putty, measuring tanks for measuring the proportion of paint, hardener and thinner;
- Often painting at home is associated with the adhesion of dust particles, as well as the formation of smudges (due to lack of experience). To remove dust particles, a polishing machine with wheels of different hardness is used. The device will help give final shine and smooth out shagreen. Subsequently, the polishing machine will help you polish the scratches that inevitably form during the operation of the car.
Partial painting
Sometimes the body does not require complete painting, but its individual removable parts have already lost part of the paintwork due to some damage.
In such a situation, you can partially paint individual areas of the car. The bumper or sills, for example, can be removed, and if this area on the body is not replaceable, then we seal the rest of the part, as described above.
If the area is not large, you can paint the car with a spray can, without neglecting all the necessary preparatory work, as during the main painting.
Both when painting with a spray can and when painting with a spray gun, you need to understand the seriousness of the process and move evenly and gradually avoiding sharp transitions and layers of paint.
Replacing thresholds with your own hands - advice from professionals on repairing the bottom and thresholds (120 photos)
Do-it-yourself carburetor adjustment - 120 photos and tips on how to properly set up and check the unit
How to replace spark plugs: how to quickly and easily check the operation, remove and install spark plugs in the engine (80 photos)
Painting process
When all the preparatory work is completed, we begin painting. Quick-drying enamel paint must be used. Following the instructions on the package, the paint must be mixed with a solvent to achieve the desired consistency, which is determined by the speed at which drops flow from the metal.
Painting a car with a spray gun yourself begins with checking the device for functionality, then diluted paint is poured into the container. The painting process occurs from top to bottom, starting from the roof of the car.
DIY bumper: how to make a unique polymer bumper for a car at home (125 photos)
Polishing a car with your own hands - a step-by-step master class on how and how to polish a car’s paintwork (70 photos)
Polishing headlights with your own hands - how and how to properly polish headlights at home (100 photos)
You should paint in two layers with breaks between them of up to one hour, depending on how quickly the paint dries. So the color is revealed only after applying at least two layers of paint. Before assembling the removable parts, you must let the body dry for at least 2 days.
Stripping
Further preparation of the car body for painting involves not only eliminating the top layer of old paint, but also straightening and welding work. However, before you begin, you need to remove all parts that do not need to be painted. Remove handles, windows, headlights, bumpers. You can try protecting some areas with newspapers or plastic wrap. Some parts can be sealed with masking tape. But this is not always convenient, so you need to carefully check whether the parts left in their places will interfere with you. Wheel covers are simply put on.
What places need to be straightened?
- Dents
- Bends
- Deep scratches
- Folds
For such work, special tools are used, ranging from a regular hammer to a pneumatic one. In order for straightening work to be carried out efficiently, you need a percussion tool and support. The working surface of tools and devices must be absolutely smooth, otherwise it will not be possible to avoid marks on parts that have been straightened.
Protection of parts that cannot be processed
If there is a lot of straightening work and little experience, then it is advisable to entrust this part of preparing the car surface for painting to a professional tinsmith.
Advice: If the car is not new and has already undergone body repairs many times, then it is hardly worth striving to remove all dents. The fact is that the metal inevitably stretches during straightening, and in the end, after straightening the next dent, it may simply become redundant.
According to the technology for preparing and painting a car, after straightening and welding work, you can proceed directly to cleaning.
Why is cleaning necessary?
- To smooth out welds
- Sand chips and cracks
- Remove old paint.
Stripping Tools:
- Special plane
- Grinder or grinder
- Sandpaper
- Scotch-Brite sponge
Cleaning up
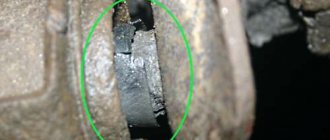
It is more convenient to smooth out chips and cracks that noticeably protrude above the surface of the car body with a special plane. Weld seams are usually ground with a grinder. A grinder can also be used to treat large surfaces that are heavily corroded, for example, wheel arches. Larger dents and scratches are treated with a grinding machine, small ones - manually with sandpaper. Be sure to sand those places where rust bubbles have formed. This is done carefully to remove the layer of damaged metal. Next, final sanding is done by hand or with a sanding machine with fine sandpaper. As a result, the treated areas must be completely cleaned, leaving bare metal.
Sanding Scratches
Here you only need to matte it - lightly sand it so that the surface is not smooth. For matting, it is convenient to use a Scotch-Brite sponge. It can be applied dry, with water or special matting products.
In some cases, it is more convenient to remove the paint after etching with caustic soda. This method is relevant when you need to clean a large surface with cracked paint. Caustic is applied in the evening (this is done with a brush, since the substance is very caustic), and in the morning the paint can simply be washed off with a stream of hot water. The next step is a rust converter or destroyer. It is convenient to use the gel composition Rust Destroyer B-52. This product is applied to the surface with a brush for 10-15 minutes, after which it is removed with a rag. B-52 does not spread even on a vertical surface, which allows you to treat problem areas without affecting healthy areas. As a result, the rust is completely removed, leaving a section of pure metal.
All that remains is to degrease the surface with gasoline and you can proceed to the next stage of preparatory work.
Car painter tool
Let's start with the workplace - in body repair, order comes first.
In the previous article, we agreed that our task is to learn how to prepare a car for painting under conditions that are available not at the dealer, but at the car enthusiast. So, you need a lighted room with ventilation (in winter), because... In summer you can open the gates. The air temperature in the room is not lower than 12-14 degrees. It is very useful to have a safit on a tripod - you can use it to illuminate the area being repaired and dry the material. In summer, preparation for painting can be done outside, the main thing is that the wind does not carry dust. To stir and apply the putty, you need a spatula. They are cheap and sold in sets. Two steel spatulas 10-15 cm wide are sufficient. You also need to have a set of rubber spatulas up to 15 cm wide for applying putty to shaped surfaces (mainly wing arches). And it wouldn’t hurt to have a couple of wide spatulas from 25 to 50 cm in your arsenal for applying putty to large plane irregularities. Naturally, you need to make a container for washing spatulas from a plastic solvent canister and buy a couple of hard brushes for the same purpose. Don’t forget to service all car painting tools immediately after use, otherwise they are usually thrown away later.../p>
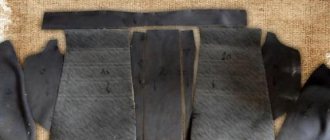
To process the putty, we need bars with paper clips or Velcro - if we work with 3M strips. It is cheaper to use clamping blocks and abrasive tape rather than Velcro strips. You need to have bars: 70 x 400mm plastic flexible (for processing the roof and hood), 70 x 400 non-flexible, 70 x 200, 70 x 120. It is very useful to have several small rubber bars (about the size of a pack of cigarettes), with a thickness of 5 to 20 mm . That's all for now on the bars.
Sander. In body repair, it is necessary for working in the “dry” method. For those who work the old-fashioned “wet” way, a machine is not needed. I highly recommend the RUPES angle grinder, with a 125 mm disc for abrasive wheels and a dust collector. This electric machine will last for many years, and there are spare parts for sale. Such a machine costs from 9,000 to 12,000 rubles. For working in harsh garage conditions, a hair dryer is very useful. For 1000 rubles you can buy our Russian hairdryer on the construction market and it will serve faithfully.
Compressor. A simple household compressor with a 20L receiver will do. made in China for 4000-5000 rubles. A very reliable device and its characteristics are quite sufficient for preparing the body for painting. Buy a simple oxygen hose, for example 9mm, the length is at your discretion. It is very important to place an air filter in the gap in the hose, closer to the compressor. The fuel injection filter from the Zhiguli is perfect for this purpose.
For primer and liquid putty you will need a spray gun. A VOYLET spray gun with an upper tank, nozzle 1.5 mm, is perfect for this purpose. Its average price is 500 rubles. There is no point in buying a more expensive pistol - the effect is the same.
Well, that's all about the main instrument. Over time, slowly buy the various small devices and bells and whistles you need individually for body repairs - in the meantime, you can safely purchase everything described above - this will be enough to prepare the body for painting.