Adjusting headlights Renault Megane 2
AUTOMATIC TURN ON OF EXTERNAL LIGHTING WHEN THE VEHICLE IS STANDARD (ACCOUNTER EXTERNAL LIGHTING)
Depending on the modification, cars are equipped with a system for automatically turning on low beam headlights (when the engine is not running) to illuminate the space in front of the car.
This function is performed only when the ignition is turned off, with the exterior lighting switch, direction indicators and fog lights in the neutral position, and the parking lights are turned off and for 30-second periods of time (no more than two minutes).
The function is activated using the turn signal, exterior lighting and fog light switch lever:
– move the card in the reader to the 1st fixed position;
– turn on the high beam headlights briefly by moving the switch lever;
– the low beam headlights turn on for 30 s. Each time the high beam headlight alarm is turned off, the duration of the low beam activation increases by 30 seconds (for a total of no more than two minutes). This function is disabled when the parking lights or ignition is turned on.
AUTOMATIC TURN ON OF EXTERNAL LIGHTING WHILE DRIVING
This function is switched on or off using the exterior lighting, direction indicator and fog light switches if the UCH is configured correctly.
With the engine stopped or the vehicle stationary with the engine running, press and hold the “Auto” switch at the end of the exterior lighting, turn signal and fog light switch lever.
When the state changes, the instrument panel emits a sound signal and a corresponding message appears. From this moment on, the system operates in automatic mode. To return to manual control mode, follow the same steps.
Adjusting the headlights with a halogen lamp
We adjust using this method only with halogen lamps; with gas-discharge lamps, you need to adjust using an optical stand.
Checking the air pressure in the tires.
We install the car perpendicular to a smooth wall at a distance of three meters. The driver must have an assistant or a 75 kg weight on the driver's seat.
We mark the screen on the wall as shown in the figure. The longitudinal plane of symmetry of the car should pass along line 0 on the screen.
The distance “A” between lines 1 and 2 should be equal to the distance between the centers of the low beam lamps. Rock the car sideways so that the suspension springs self-align.
We measure the height of the centers of the headlights from the ground on your car. This will be the distance "h" on the screen.
We set the headlight adjustment control on the instrument panel to a position corresponding to the load of a car with one driver.
Turn on the low beam.
We adjust the direction of the light spot for each headlight separately. We cover the second headlight.
Open the hood and, by rotating the adjusting screws, adjust the position of the light spot for each headlight horizontally and then vertically.
The headlights are considered adjusted when the upper boundaries of the left parts of the light spots coincide with line 4, and the vertical lines 1 and 2 pass through the intersection points E1 and E2 of the horizontal and inclined sections of the light spots.
To access the horizontal adjustment screw, use a 6 mm hexagonal angled wrench through the hatch in the wheel arch
Replacing and adjusting Megane 1, 2 and 3 headlights and mounting diagram
The external lighting system of Renault Megane cars has been gradually improved with each new release of this model. If the manufacturer installed lamps of the same type on Megan 1, then on subsequent, restyled models of the second and third generations, they were replaced by xenon or improved halogen. Accordingly, the configuration itself and the system for connecting external lighting elements to the on-board network changed slightly.
How to adjust headlights with your own hands? | Renault Megane Club | Renault Megan Club | VK
Where is the headlight adjustment for Renault Megane?
Removing front lighting devices Before directly removing the headlight, the first thing you need to do is to remove the front bumper from the car.
Renault Knowledge Base. Megane 3/Fluence. electrician Adjusting the low beam on Fluence. Adjusting the low beam headlights...
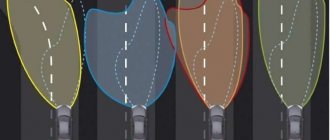
At the front, the screen is bent upward so that the direct rays emitted by the low beam filament are also not dazzling. Finally, in the American system, the low beam thread is also slightly shifted to the left from the direction of movement of the car, so the light spot of the headlight on the road is deviated towards the right side of the road.
Accordingly, the configuration itself and the system for connecting external lighting elements to the on-board network changed slightly.
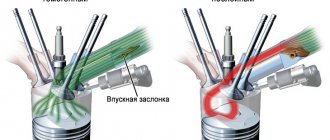
Please note that rays falling on the inner reflector zone are reflected from it towards the road.
Rays hitting the outer part are deflected upward. Some of the rays are directed forward in a parallel beam.
To reduce the part of the light flux that deviates upward, a reflector of shallower depth is used, but at the same time the luminous efficiency decreases. To compensate for this, a higher-power main beam filament is used.
Removing front lighting devices
- Before directly removing the headlight, the first thing that needs to be done is to remove the front bumper from the car. Open the hood and, using a flat-head screwdriver, carefully pry up the fasteners with which the bumper is attached to the Renault body and remove them.
- On the sides, the bumper is attached to the car wings using self-tapping screws, which must be unscrewed using a 7 key. Be extremely careful - do not break off the fastening ears, otherwise they will have to be replaced.
- Now carefully detach the upper part of the bumper from the car body. The last thing we need to do to remove the bumper is to pull out the rivets from the bottom of the car that support the bumper from below, not forgetting to disconnect the foglights.
- Now it’s the turn of the lighting device itself. We unscrew three bolts (one on the side and two on top), using a 10mm socket with a ratchet, with which the headlight is attached to the car body. At the bottom there are also fastenings - two bolts that are unscrewed with the same 10mm head, but using an extension.
- Now that the headlight has been removed from all its mounts, we move it toward ourselves in a smooth motion so as not to break the power wires of the electrical corrector. Use a screwdriver to disconnect the power connector, the work is completed. Now you can replace both the headlight itself and its lighting elements. Installation is carried out in reverse order.
Adjusting the direction of the car's exterior lighting beam
Adjusting the direction of the light of the car's front lamps is very important when driving a Renault at night. One of the main problems when driving at night is dazzling oncoming drivers. The reasons for this may be overloading the car, improper adjustment of the headlights, or physical damage to them.
If a lighting element breaks, it must be replaced. If you are transporting heavy loads, due to which the load on the rear beam increases, the center of gravity of your Renault automatically shifts, therefore, when you turn on the low beam, the upper limit of dispersion rises, which leads to dazzling of drivers of oncoming cars. To avoid this, there is a corrector switch in the car interior, with which we reduce the angle of inclination.
The easiest way to adjust the direction of the Renault low beam beam, which you can do yourself in your garage, without any additional disassembly of the car, is as follows:
- place the car on a horizontal platform;
- there should be no cargo in the trunk or interior of your car;
- drive up to a distance of 5 m from the front edge of the bumper to your garage door or fence;
- turn on the low beam headlights, first set the corrector switch to position “0”;
- Using the regulator, which is located on the back of the headlight unit, we set the correct position of your devices.
Don’t forget that more precise adjustments can be made at a service station using a special device.
Quite often, Renault Megane owners have questions about rearranging the front lighting fixtures from Megan 2 phase 1 to Megan 2 phase 2; let’s look at this issue in more detail. It is worth noting that the car, which was produced in the period from 2003 to 2006, was labeled as “Phase1”, and was replaced by Megan 2 “Phase2”, which came off the assembly line from 2006 to 2009.
The main differences in the external lighting system between phase 1 and 2 are:
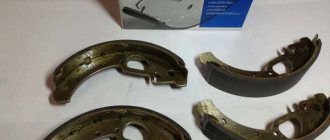
Changing lamps
If this is the first time you need to replace a light bulb on Megan 2, then before you begin this operation, you will have to face the choice of a lighting element.
Since there is a large assortment of them on sale, making a choice is not so easy. The low beam bulb on the Renault Megane 2 complies with the H7 standard - it is a single-filament lamp with a two-pin base.
There are currently several types of such lamps on sale:
- Halogen - standard lamps.
- Xenon (gas discharge).
- LED.
The photo shows a halogen light bulb with an H7 base.
| LED | Xenon | Halogen | |
| Brightness, Lm | 2000 | 3300 | 1550 |
| Durability, number of hours | Up to 50,000 | Up to 3000 | Up to 1500 |
| Luminous flux color, K | 4300-7000 | 4300-8500 | 3300 |
| Power, W | 40 | 35 | 55-130 |
| Price in USD | From 10 | 40 | 30-170 |
Based on the data in the table, we can come to the conclusion that xenon and LEDs, for example, for fog lights on a VAZ 2110, are superior to halogens in everything except cost.
However, the latter have some important advantages that may outweigh the choice:
- The light beam has good penetrating ability, as a result of which it “pierces” snow, rain and fog much better than the light of “xenon” and “LEDs”. Owners of the latter often complain on forums that in bad weather the quality of lighting decreases sharply.
- Ease of installation - unlike new products, halogen lamps do not require the installation of ignition units and reprogramming of electronics. Therefore, you can perform the replacement yourself.
As we can see, each type of lamp has its pros and cons, so we cannot say that some are better than others. Accordingly, each driver must decide for himself which low beam lamp for Renault Megane 2 will be the best option in his case.
Wheel arch hatch cover
Replacement procedure
Replacing the low beam bulb on a Renault Megane 2 in the left and right headlights is done differently.
First, let's look at how to install it on the left side:
- First of all, you need to start the engine and turn the steering wheel all the way to the left.
- Then you need to remove the hatch located in the wheel arch with your own hands.
- Next, you need to stick your hand into the hole, feel for the round plug and remove it, turning it slightly to the side. The plug should be pulled out through the hatch, performing the operation carefully so as not to drop it.
Claw with connector
- After this, you need to find the light bulb with the connector. To pull it out, you need to pull the block towards you, shaking it up/down.
- Having removed the lamp with contacts, you can pull it out of the hatch to the length of the wires in order to disconnect it from the machine connector and connect a new lamp. The low beam connector on Megan 2 does not have latches, so you just need to pull it while holding the base.
- Then the light bulb with the socket needs to be inserted into the headlight unit by touch and then install the plug.
Replacing the low beam lamp on Megan 2 in the right headlight is performed as follows:
- You need to open the hood and pull out the tank filler neck.
- Now that access to the headlight is open, you need to remove the plug and perform all the steps described above from the engine compartment.
Read more: Replacing the fuel filter on a Ford Mondeo diesel and gasoline photo and video
Here, in fact, are all the instructions for installing new halogen low beam bulbs.
Mounting block number 13
Repair Renault Megane 2: Adjusting the headlight with a halogen lamp Renault Megane 2
We measure the distance to the asphalt.
I got 74 cm Risks on the headlight Next we go to the wall. We measure 2 distances.
Adjusting the headlight with a halogen lamp Renault Megane 2
Accordingly, the light that comes to the left will pass along the pink line. Place for vertical adjustment.
Horizontally through the hatch in the fender liner... Well, you understand. Somehow this is how it happened. I’m happy with the light. It’s a pity I didn’t take a photo of the result before... The light was crooked upwards. I got the idea here, everything is clear!
Place a fully fueled and equipped car with a load of N 75 kgf on the driver’s seat on a flat horizontal platform 5 m from a smooth wall or any screen, a plywood panel measuring about 2x1 m and.
Before marking the screen, make sure that the air pressure in the tires is normal, and then rock the car sideways to install the suspension springs.
Draw vertical lines on the screen (see Headlight adjustment diagram): These lines must be symmetrical relative to the center line of the car.
Renault Megane › Logbook › Tell me? Adjusting the light vertically and horizontally...
Hello everyone... as I wrote earlier, my Swan's maxillofacial part was broken... The headlights were completely changed, but the master refused to adjust, saying it was a delicate process, and it was too much for him... I found an excellent article on the website of a man from Barnaul... I found it on our website in the city there is such a site - the “BOSHE” shopping center, and the walls there are white, and it’s very good to draw with chalk... But when adjusting the right headlight with a hexagon, I had to unscrew it all the way to raise the beginning of the “tick” to the bottom line (my distance from the ground is 73 cm, apparently The tires are very worn.)
Well, in general, okay... I think I’ve figured it out in terms of height... but horizontally...